The Solve panel is used to configure and then run an optimization. This topic describes the options available in the Equations tab of the Solve panel. If you need more information about Solve before you begin, see Solve Overview.
Panel buttons (top-right)

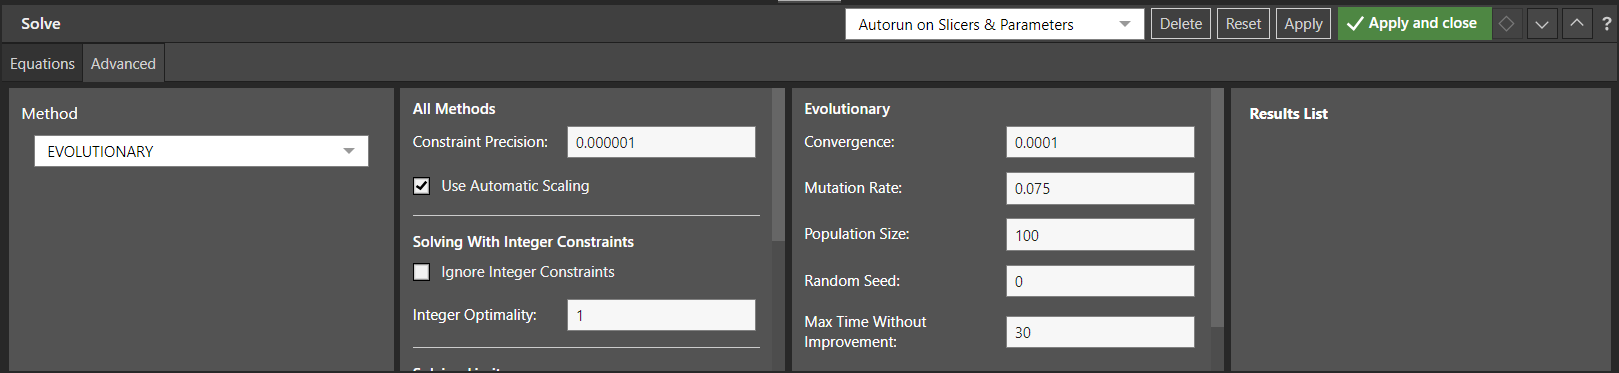
Auto-run Settings
The Auto-run dropdown list offers the following options:
- Autorun on all changes: Run the Solve algorithm automatically every time you make a change in a sheet. For example, when prompted by a change in any cell, change of a slicer or parameter, or an addition of data.
- Autorun on Slicers & Parameters (default): Run the Solve algorithm automatically every time you change a slicer or parameter value.
- Manual Execution: Only run the Solve algorithm when Apply or Apply and close is manually clicked.
Further Options
|
Name |
Description |
|---|---|
|
Delete |
Delete the current optimization and close the Solve panel. |
|
Reset |
Reset to the last saved settings and leave the Solve panel open. |
|
Apply |
Run the Solve algorithm and leave the Solve panel open. |
|
Apply and close |
Run the Solve algorithm and close the Solve panel. |
Equations tab (main)

Optimization Objective
The objective function (red) states the value that you want to optimize, and how you want to optimize it. This can be by finding a maximum value for it, minimizing it, or finding a particular value for it. These options also specify which variables the Solver can change in order to optimize your objective value.
- From the "I want to" field, first select the option that describes how Solve should try to optimize the value:
- Select Maximize to find the largest possible value.
- Select Minimize to find the smallest possible value.
- Select Set the value of and specify the exact value that you want to find.
- In the next field, you need to set up the objective cell that you want to optimize, either:
- Click your cursor in the field and select the cell that contains your objective value in your sheet.
- Type the cell reference into your cell manually. Note that, if you type your reference, the cell will be highlighted when you click away to indicate your selection.
- From the "By changing the values in these
cells" field, select the cells whose values will be changed to achieve the
objective. These are the decision variables.
Note: To have an effect, the decision variable cells must be related to the objective cells in some way, or to the cell reference by at least one constraint.
"Quick" Constraints
The Quick Constraint checkboxes (green) describe constraints that apply across all of the decision variables defined in your "By changing the values in these cells" fields.
Note: Quick constraints and constraints may conflict! If a quick constraint defined in the Optimization Objective panel and an explicit constraint defined in the Constraints panel conflict (for example, where "All Values Are Greater than Zero" is selected but one of the cells also has a <= -3 constraint), the explicit constraint takes precedence over the quick constraint. Where the constraints are not in conflict, they both apply.
|
Checkbox |
Description |
|---|---|
|
All Values Are Greater Than Zero |
The results will only include values that are above zero. This option has the same effect as defining a constraint where the value must be greater than zero. |
|
Present Outcomes As Whole Numbers |
The results will only include values that are whole numbers (after the optimization, all values in the decision variables cells are integers and not doubles or floats). This option has the same effect as defining a special constraint where the value of these cells must be the special type "variable is a whole number". |
Constraints
Constraints describe the limitations on the resources available.
All Constraints
Shown on the preceding screen shot with a blue arrow.
|
Name |
Description |
|---|---|
|
Clear constraints |
Click Clear Constraints to remove all constraints. |
|
Add (+) |
Click the + symbol to add a new constraint. |
Individual Constraints
Shown on the preceding screen shot with a yellow box, and expanded below.

- Click the Name (red arrow, above) to make the name editable, and provide a meaningful replacement name for your constraint.
- The Referenced Cells (green arrow) field in each constraint represents the resource that is limited by the constraint you are describing. For example, one or more cells that describe some stock that can never have a value of less than 500 units. Tip: If your constraint applies to a number of cells, you should select the whole cell range, rather than creating a different constraint for each cell.
- The Operator (blue arrow) sits between the referenced cell and the limiting value. For more information about relational and special constraints, see Constraints Details and Examples (below).
- The Limiting value (yellow arrow) is the value the referenced cell is compared to, or the name of the "special" comparison.
- The Delete Constraint (purple) deletes a single constraint.
Note: The name of the constraint will attempt to default to a meaningful value, matching the name of the selected column or row in the spreadsheet and suffixing an underscore "_".
Note: The more constraints you add to your problem, the longer it might take to solve.
Note: Integer constraints have many important applications, but the presence of even one such constraint in a Solve model makes the problem an integer programming problem. Integer programming problems may be much more difficult to solve than a similar problem without an integer constraint.
Constraints Details and Examples
There can be two types of operator:
- Relational operators. Compares the value in a cell to a number. For example, the result must be less than or equal to (<=) 100.
- Special constraints. Makes "special" (out of the box) constraints available for selection. For example, the result must be a whole number.
Note: Quick constraints and constraints may conflict! If a quick constraint defined in the Optimization Objective panel and an explicit constraint defined in the Constraints panel conflict (for example, where "All Values Are Greater than Zero" is selected but one of the cells also has a <= -3 constraint), the explicit constraint takes precedence over the quick constraint. Where the constraints are not in conflict, they both apply.
Relational Operator
Where the relational operator (blue, above) compares the value in a cell to a number or another cell (yellow), it can be one of:
>=greater than or equal to<=less than or equal to=equal to
For example, you might select that your cell value must always be less than 100. Where one of these operators is selected, the value field contains a number or a cell reference.
Tip: A complex constraint such as 0 <= a16 <= 1000 must
be expressed as two separate constraints:
a16 >= 0a16 <= 1000
The preceding constraints limit my resources as follows:
- Avg Time: The "average time" in cell G2 of sheet1 must be exactly 40 whatever the optimization is.
- Pies: The number of Pies (A2) to be produced must be greater than or equal to 100.
- Flour: The amount of Flour (D2) that I have available to me cannot weigh more than 10,000 grams.
Special Constraints

Where the operator is "special" the constraint is selected from a dropdown list of options:
- Variable is a Whole Number. The value must be an integer and not a float or double.
- Variable is a Binary Number. This is a boolean constraint. The value must be 0 or 1, representing false and true respectively.
- All Variables are Different. The range must include only unique variables.
In the preceding example, the special constraint "Variable is a Whole Number" applies to the decision variable cells B2 to B5 on my Tabulate sheet (CurrentContrent):
- The constraint indicates that the solution values for cells B2 to B5 must be integers or whole numbers, such as -1, 0, 3, to within a small tolerance.
- The tolerance is determined by the value of the Constraint Precision option (Advanced settings).
- Integer constraints (Advanced settings) may also be used when a fractional solution value, such as 1.5, wouldn't make sense in your problem. For example, if the decision variable represents individuated items, such as a number of people or trucks.
In the preceding example, the special constraint "Variable is a Binary Number" applies to the decision variable cell B4 on my spreadsheet:
- The constraint implies that the value in cell B4 must be either 0 or 1 when any solution is found. It is equivalent to specifying B4 is a whole number, B4 is greater than -1, and B4 is less than 2.
- B4 can, therefore, be used to represent a "yes/no" decision, such as whether or not to build a new manufacturing plant.
In the preceding example, the special constraint "All Variables are Different" applies to the decision variable range B2 to B5 on my spreadsheet:
- The constraint requires that these cells must be integers in the range 1 to N (N = 5 in this example), with each variable different from all the others at the solution.
- Hence, B2:B5 can contain 1,2,3,4,5 or 1,3,5,2,4.
- Note: This type of constraint can be used to model problems involving ordering or sequencing of choices, such as the Traveling Salesman Problem.
Advanced tab (main)
The advanced options are used to control how Solve "solves" your problems. You can use these settings to specify and constrain the particular method or solver used when optimizing the objective value. For more information, see Advanced Settings.
Other Topics
- For details of the step-by-step process that you need to follow to open Solve and find an optimization, see Open Solve and Create an Optimization.
- For a full end-to-end walkthrough of an example Solve optimization, see Complete Solve Example.